Binghamton University Business System (BUBS) Business Intelligence
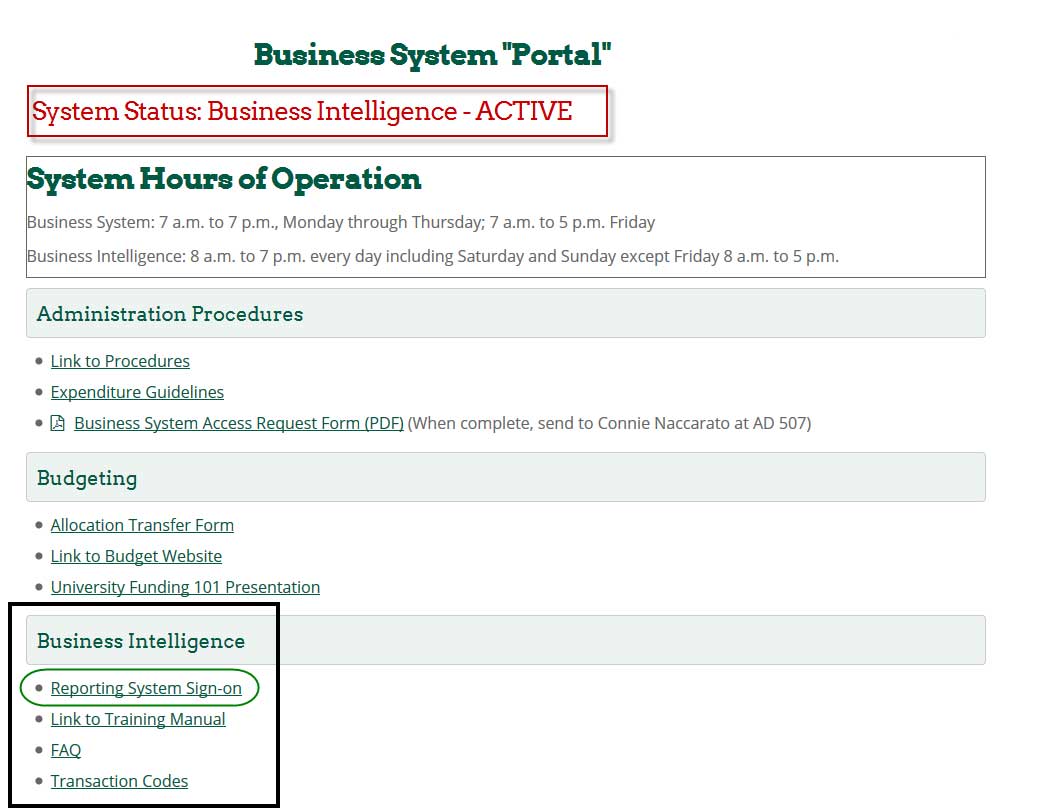
Business System Portal
Website: http://www.binghamton.edu/business-office/ (Firefox browser is preferred)
Use this link to access information on:
- System availability
- System hours of operation
- System sign on links
- Links to Business Office, Budget and HR related websites, forms, and procedures
Sub Accounting Highlights
1. Sub accounts can be created at any time during the year. However, it is strongly encouraged to set them up only as needed. Contact Scott Hatch in the Business Office if you have any questions on whether to set one up or not.
2. To request a sub account, send an email to Scott Hatch in the Business Office stating the desired account and sub account. Be sure to copy the finance representative in your Vice Presidential area on the email.
3. If an account is sub accounted, then the -00 becomes the rollup and is no longer used for transactions; instead -01 through -98 are used. -99 is only used for revenue and allocation and should not be used for any other transactions. If an organization wants a budget allocation moved to a -01 through -98 sub account, contact the financial representative for your VP area to make the move.
4. If an account is sub accounted, then revenue will be entered to the -99 default sub account.
5. To see the total balance for an account, ALWAYS enter just the first six digits.
6. If labor expenditures default to -99 then transfers to a specific sub account will not be completed until the employee has been successfully coded and charged directly to the specific sub account.
Types of Funds
| Fund Type | Account |
|
State Purpose Sub Fund Group = Revenue Offset Fund |
86XXXX or anything other than below |
|
DIFR Dormitory Income Fund Reimbursable Sub Fund Group = Dormitory |
87XXXX |
|
IFR Income Fund Reimbursable Sub Fund Group = General IFR |
90XXXX 91XXXX 9102XX |
|
SUTRA State University Tuition Reimbursable Acct Sub Fund Group = SUTRA |
9600XX 96XXXX |
|
DIFR-IFR Dormitory Income Fund Reimbursable Income Fund Reimbursable Sub Fund Group = Dormitory Sponsored |
9009XX |
Sign-On
Log into Business Intelligence using the Business System Portal. In the Business Intelligence module, click Reporting System Sign-on.
Sign in using Binghamton as the Campus and then click Login.
Login using your PODS username and password.

This is the Business Intelligence Home page. Depending on your level of access, it may look different.

Dashboard Descriptions
Dashboards are located at the top right of the page. Not everyone has access to all dashboards.

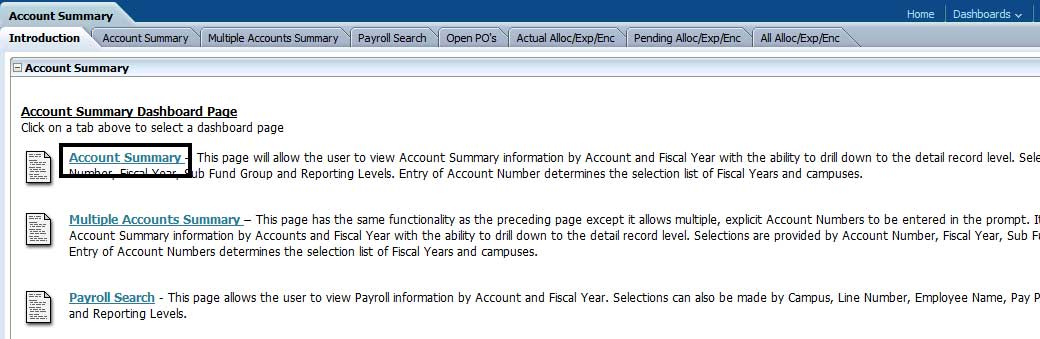
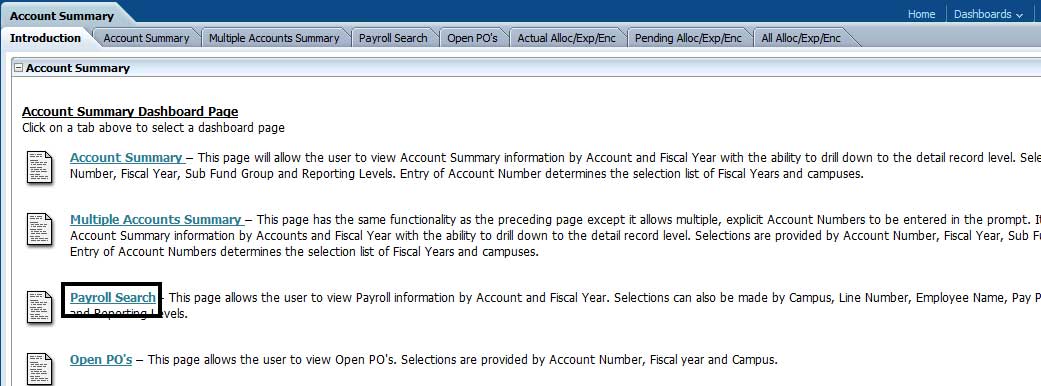
Account Summary
Account Summary – This page will allow the user to view Account Summary information by Account and Fiscal Year with the ability to drill down to the detail record level. Selections are provided by Account Number, Fiscal Year, Sub Fund Group and Reporting Levels. Default selections are current Fiscal Year.
Multiple Accounts Summary – This page has the same functionality as Account Summary except it allows multiple, explicit Account Numbers to be entered in the prompt. It will allow the user to view Account Summary information by Accounts and Fiscal Year with the ability to drill down to the detail record level. Selections are provided by Account Number, Fiscal Year, Sub Fund Group and Reporting Levels. Default selections are current Fiscal Year.
Payroll Search – This page allows the user to view Payroll information by Account and Fiscal Year. Selections can also be made by Campus, Line Number, Employee Name, Pay Period, Payroll Agency, Sub Object and Reporting Levels.
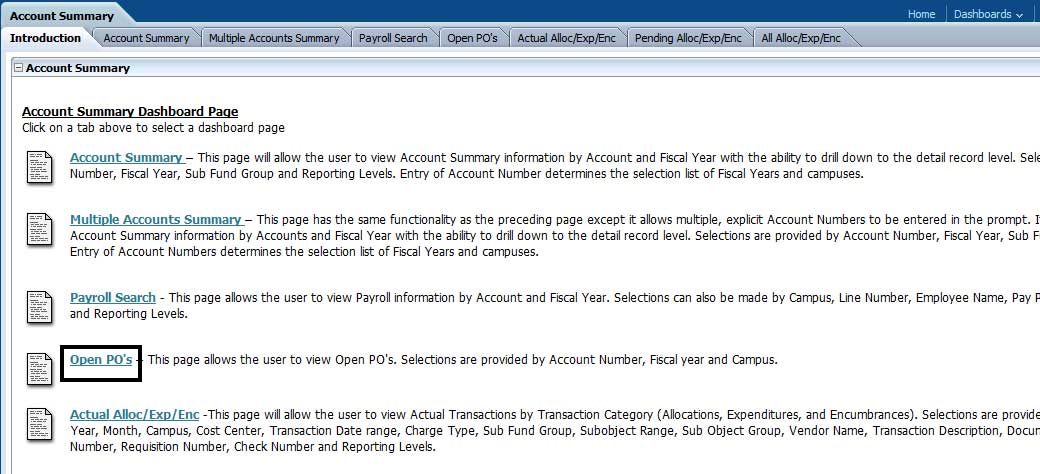
Open PO’s – This page allows the user to view Open PO’s. Selections are provided by Account Number, Fiscal year and Campus.
Actual Alloc/Exp/Enc - This page will allow the user to view Actual Transactions by Transaction Category (Allocations, Expenditures, and Encumbrances). Selections are provided by Account Number, Fiscal Year, Month, Campus, Cost Center, Transaction Date range, Charge Type, Sub Fund Group, Sub Object Range, Sub Object Group, Vendor Name, Transaction Description, Document Number, Procurement Number, Requisition Number, Check Number and Reporting Levels.
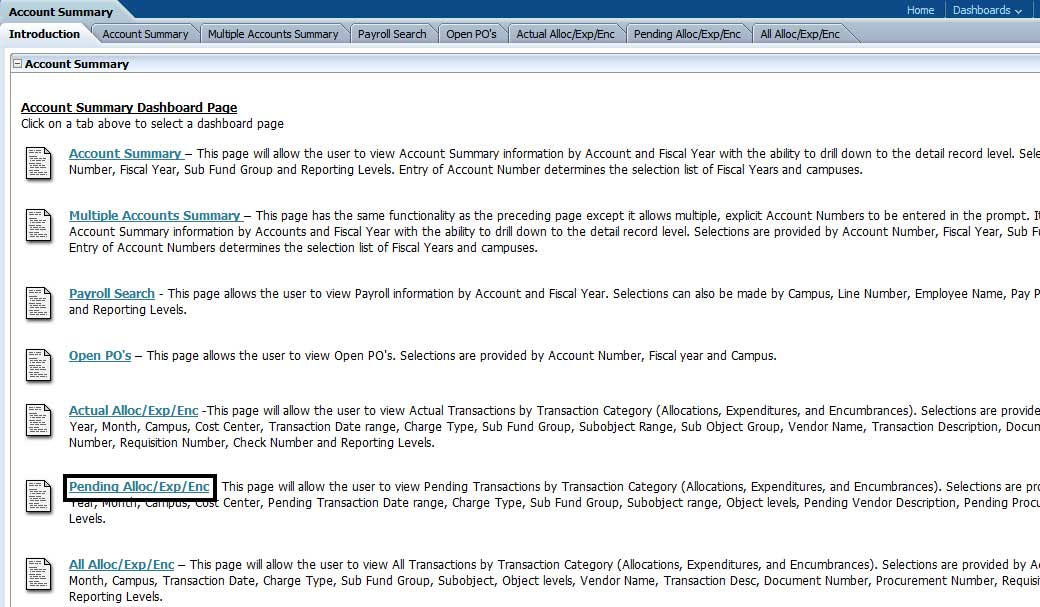
Pending Alloc/Exp/Enc - This page will allow the user to view Pending Transactions by Transaction Category (Allocations, Expenditures, and Encumbrances). Selections are provided by Account Number, Fiscal Year, Month, Campus, Cost Center, Pending Transaction Date range, Charge Type, Sub Fund Group, Sub Object range, Object levels, Pending Vendor Description, Pending Procurement Number and Reporting Levels.
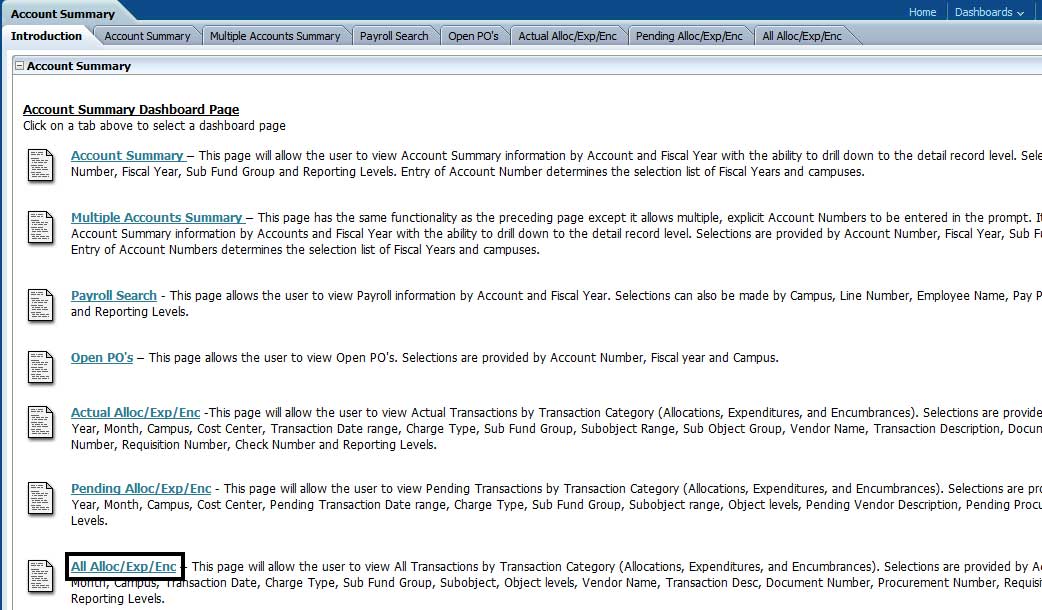
All Alloc/Exp/Enc - This page will allow the user to view All Transactions by Transaction Category (Allocations, Expenditures, and Encumbrances). Selections are provided by Account Number, Fiscal Year, Month, Campus, Transaction Date, Charge Type, Sub Fund Group, Sub Object, Object levels, Vendor Name, Transaction Desc, Document Number, Procurement Number, Requisition Number, Check Number and Reporting Levels.
Expenditure Inquiry
Payroll Search - This page will allow the user to view payroll information by Account and Fiscal Year. Selections can also be made by Line Number, Employee Name, Pay Period, Payroll Agency, Sub Object and Reporting Levels. The ability to drill down to the detail record level is provided.
Expenditure Search – This page shows individual expenditure records and the transaction amount. Selections are provided by Fiscal Year and Month, Transaction Date range, Account Number, Charge Type, Sub Fund Group, Sub Object, Sub Object Group, Vendor Name, Transaction Description, Document Number, Procurement Number, Requisition Number, Check Number and Reporting Levels.
Income Fund Reimbursable (IFR) Cash
IFR Account List – This page will allow the user to view IFR Cash information by Account and Fiscal Year with the ability to drill down to the detail record level by individual. Selections are provided by Account Number, Fiscal Year, Sub-Fund Group, and Reporting Levels. Default selections are current Fiscal Year.
IFR Master Account Rollup List - This page will allow the user to view IFR Cash information, by Fiscal Year, rolled up to a single line account total. The ability to drill down to the detail record level is available. Selections are provided by Account Number, Fiscal Year, Sub-Fund Group, and Reporting Levels. Default selections are current Fiscal Year.
Management Summary
Management Summary – This page will allow the user to view Management Summary information by Account Number and Major Object. Selections are provided by Fiscal Year Sub Fun Group, Sub Object Group and Reporting Levels. Default selections are current Fiscal Year.
IFR Summary - This page will allow the user to view IFR Summary information by Account Number and Major Object. Selections are provided by Fiscal Year, Sub Fund Group, Sub Object Group and Reporting Levels. Default selections are current Fiscal Year.
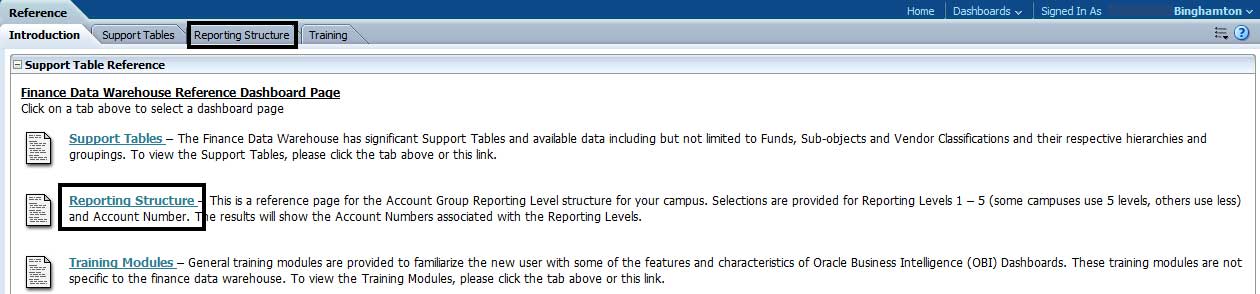
Reference
Reporting Structure – This is a reference page for the Account Group Reporting Level structure. Selections are provided for Reporting Levels 1 – 5 (typically Level 5 is used) and Account Number. The results will show the Account Numbers associated with the Reporting Levels.
Training Modules – Binghamton University Training videos. On the left side, click on Business Systems, scroll down to Business Intelligence and click on Video.
State and Dormitory Income Fund Reimbursable (DIFR) Account List
State and DIFR Account List – This page will allow the user to view State Purpose and DIFR summary information by Reporting Level at the sub account level. Default selections are current Fiscal Year.
State and DIFR Master Account List – This page will allow the user to view State Purpose and DIFR summary information by Reporting Level at the master account level. Default selections are current Fiscal Year.
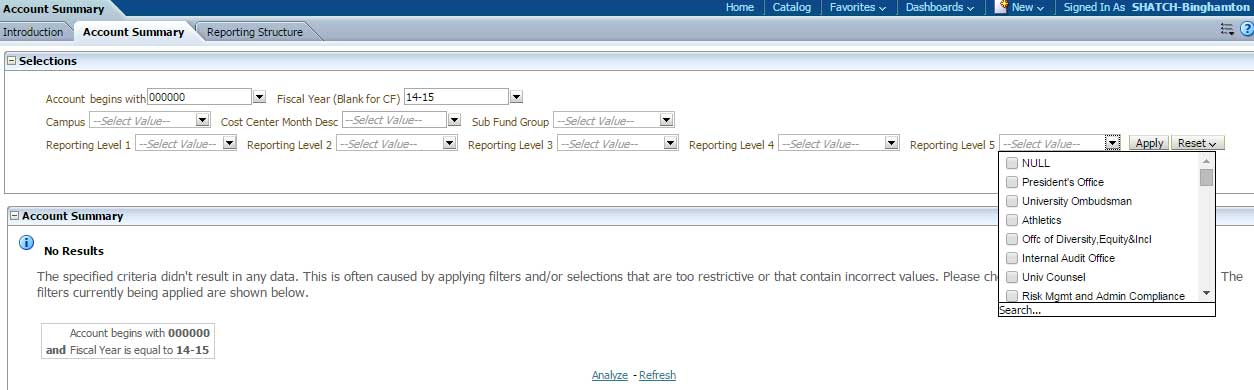
Reporting Structure
Reporting Structure is the University hierarchy which is broken into Levels 1 – 5. Reporting Structure will show you all accounts associated under a specific department. To get to the Reference dashboard, click the Dashboard pull-down menu and in the Financials group, click on Reference.

Reporting Structure screen:
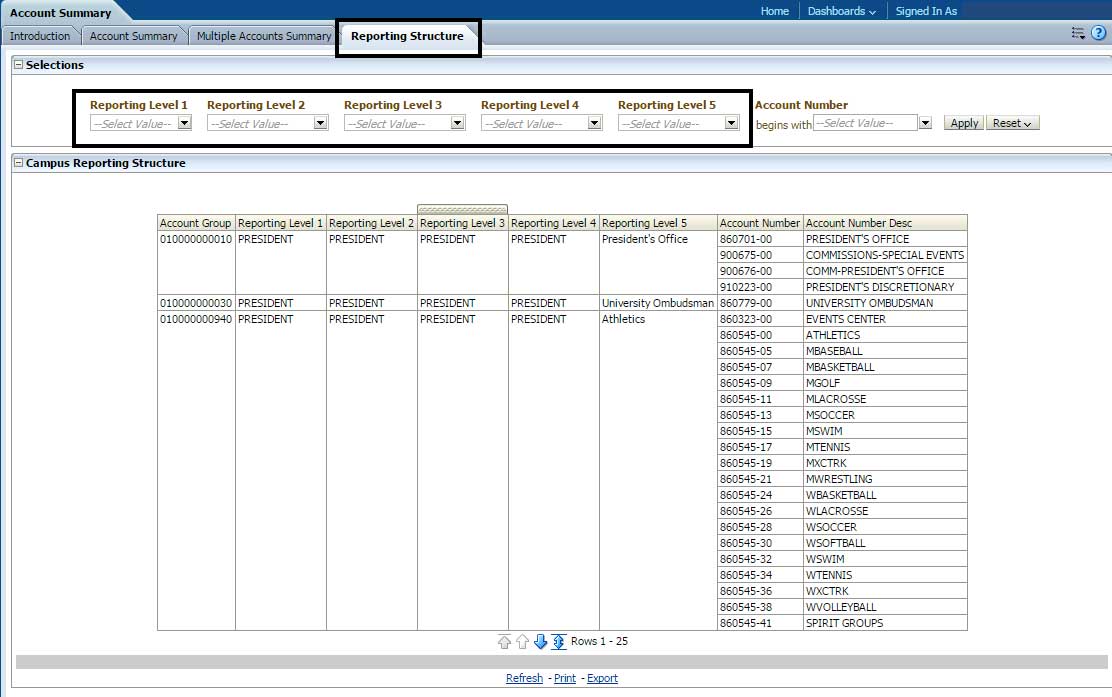
Reporting Level 1 – can choose all accounts under a specific Vice President.
Reporting Level 2 – can choose all accounts under a specific School/Dean, Director, etc.

Reporting Levels 3 & 4 - are used to further define the org chart which is used uniquely for each area.
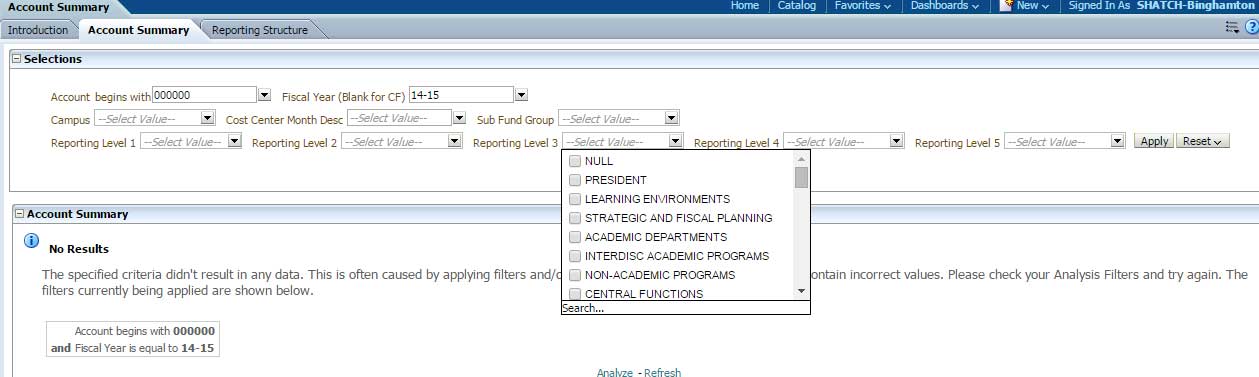
Reporting Level 5 – can choose all accounts under a specific Department (depends on your access).
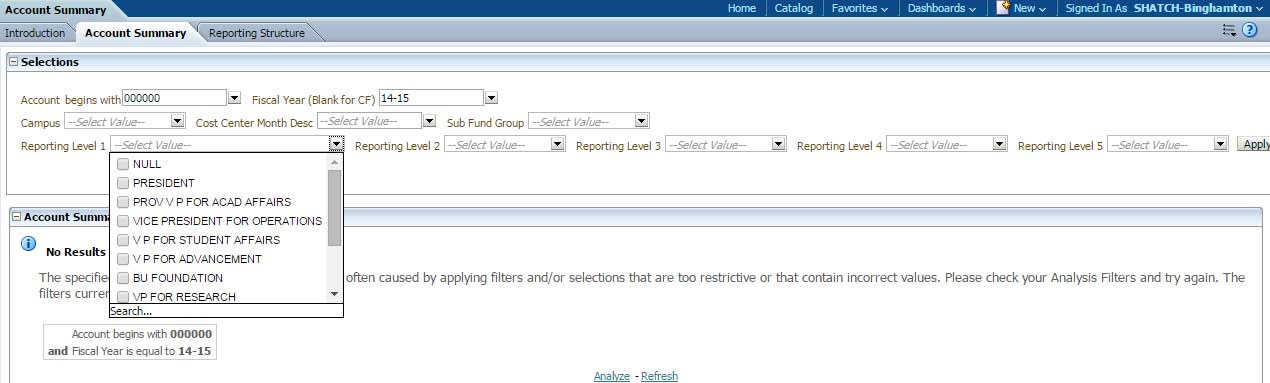
Account Summary Dashboard
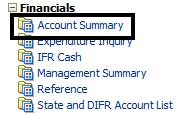
For most users, Account Summary will be the dashboard most used. To get to the Account Summary dashboard, click the Dashboard pull-down menu and in the Financials group, click on Account Summary.
Account Summary screen:
Search Criteria
Click in the Account begins with field and type in the 6 digit account code; the default is always all zeros. (This keeps the system from searching for account data when you first open the page).
If you are looking for a sub-account, you will need to use the 8 digit code, including the dash (ex: 999999-99). Tab to Fiscal year, default is current year, but can be changed via pull-down.
Sub Fund Group
A Sub Fund Group shows you the different accounts you can search for:
- Revenue Offset Fund: this is your state purpose account
- General IFR: Income Fund Reimbursable (IFR)
- SUTRA: State University Tuition Reimbursable Account
- Dormitory Operations: Dormitory Income Fund Reimbursable (DIFR)
- Dormitory Sponsored: Dormitory Income Fund Reimbursable Income Fund Reimbursable (DIFR-IFR)
Click Apply to complete the search.

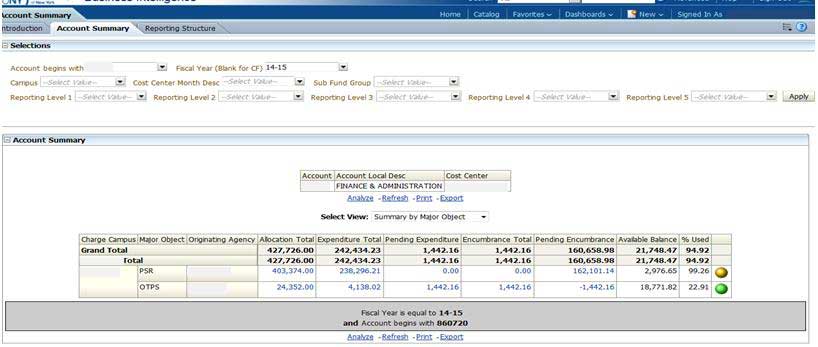
Account Summary
Pull-down menu for Select View has three options:
1) Summary by Major Object (default)
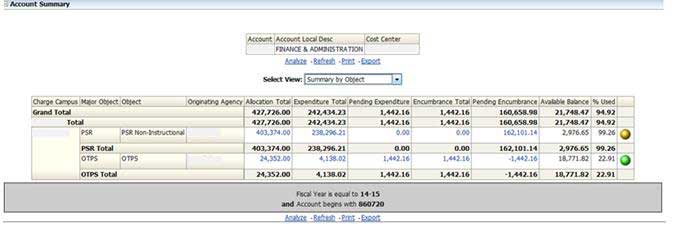
2) Summary by Object
3) Summary by Detailed Object (gives details of account)
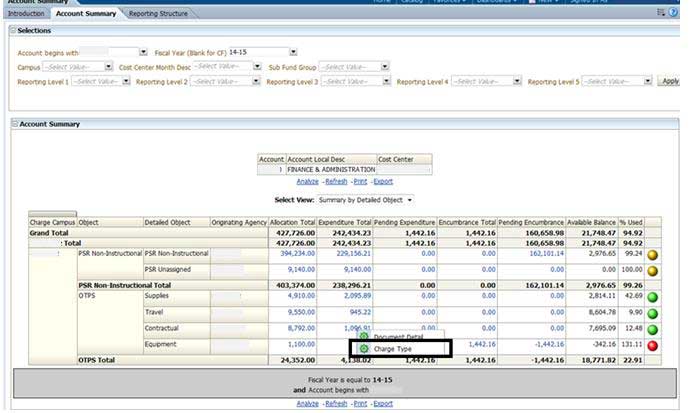
Summary by Major Object screen:
Summary by Object screen:
Summary by Detailed Object screen:
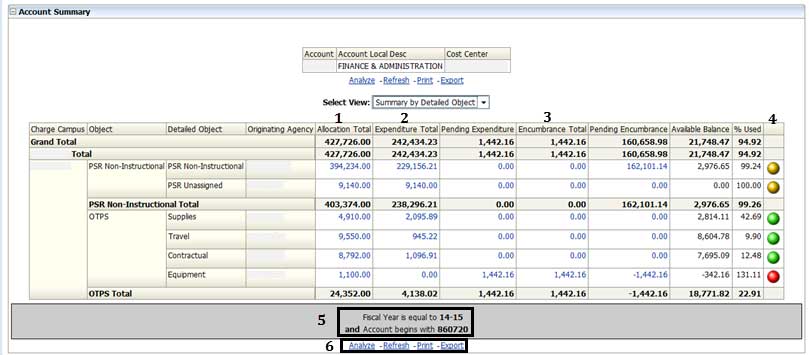
1. Allocation Total: this is the amount a department is given
2. Expenditure Total: this is the amount a department has used
3. Encumbrance Total: this is the amount that is in the process of being spent
4. Red: greater than allocated (over budget)
Yellow: within 10% of allocation total
Green: under 90% spent
5. Search Parameters: this shows you what your search criteria was
6. Refresh: refresh results
Print: print results
Export: exports results into Excel
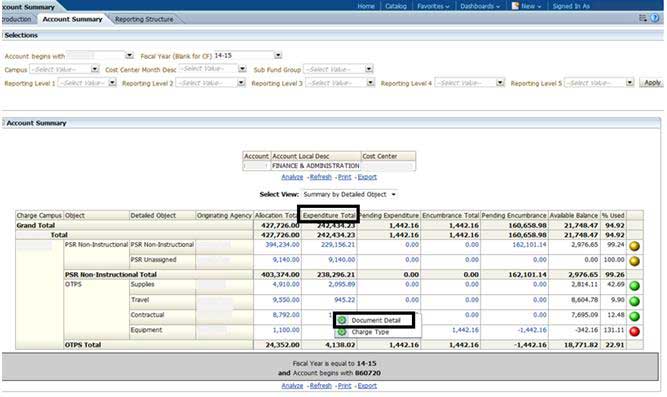
Document Detail
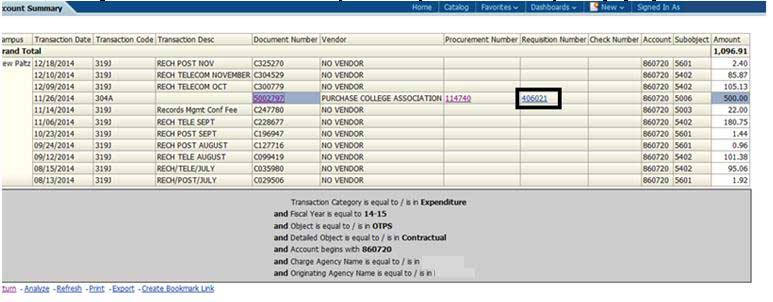
To look at expenditure detail, click on the amount in the Total Expenditure Total column. A menu will appear with either Document Detail (detailed information for expenditure) or Charge Type (information about the type of charge). Any number in blue is a drillable field.
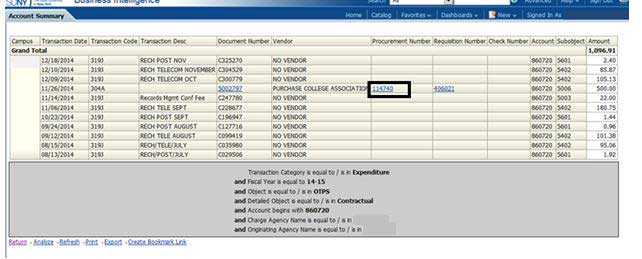
Document Detail screen:
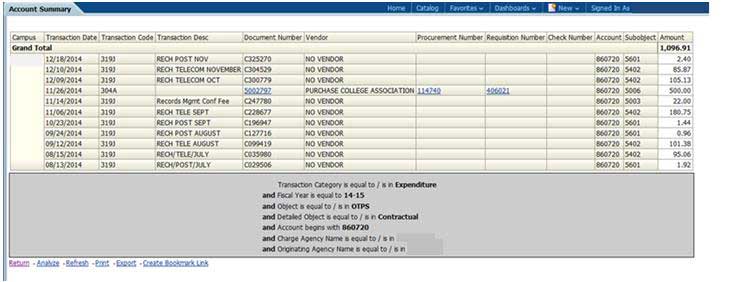
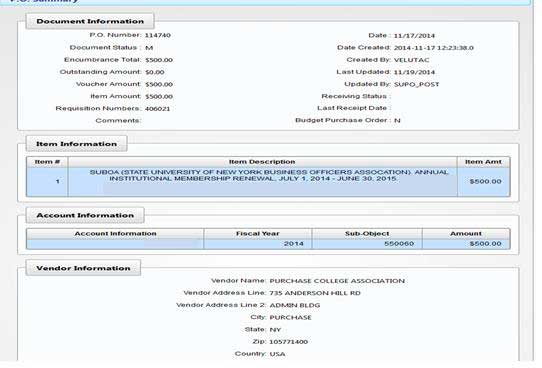
Click on Procurement Number – this takes you to Purchase Order Summary in a separate pop-up window.
Purchase Order Summary window:
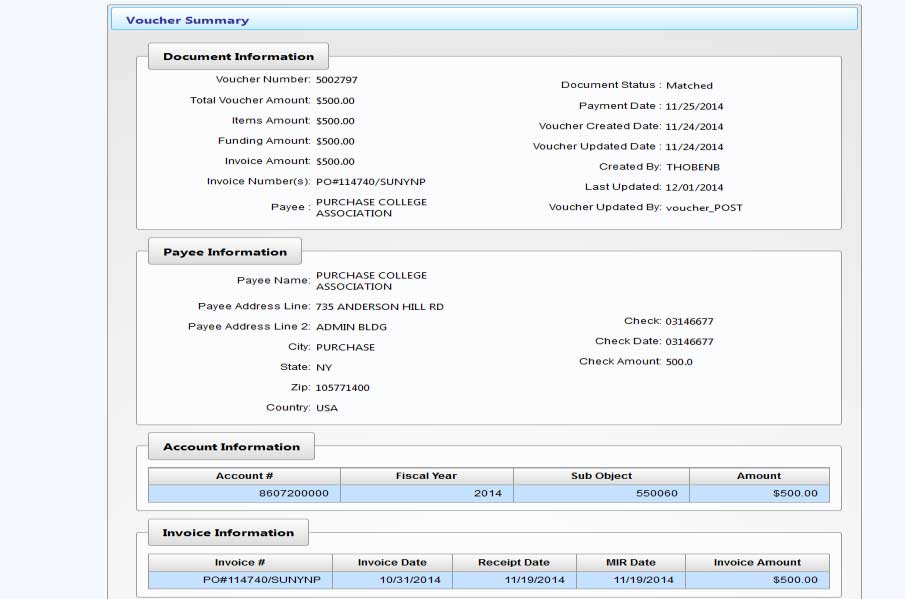
Click on Document Number – this takes you to Voucher Summary in a separate pop-up window.
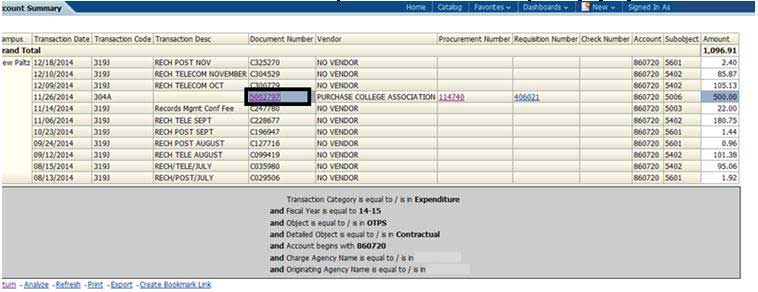
Voucher Summary window:
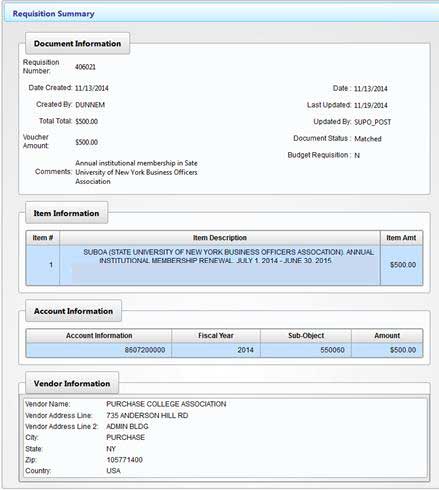
Click on Requisition Number, this takes you to Requisition Summary in a separate pop-up window.
Requisition Summary window:
To return to the previous page, always click Return on the bottom left of the page. Do not use the back button on your browser. If you use the Back button on your browser, you will lose all your search criteria.

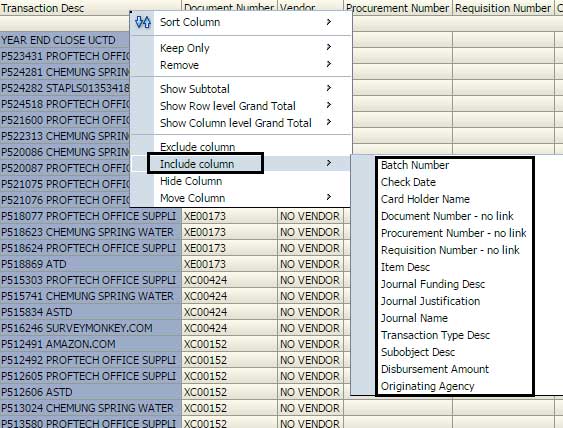
Insert Columns
To Insert a column, right click on the heading, click Include column, then select any of the options in the menu. Transaction Desc, Transaction Type Desc, and Sub Object Desc will show a more detailed description of what each column means.
Move Columns
To move columns of data, move the cursor to the headers until a crosshairs appears. This will allow you to move columns.
Charge Type
To look at expenditure detail, click on the amount in the Total Expenditure Total column. A menu will appear with either Document Detail (detailed information for expenditure) or Charge Type (information about the type of charge).
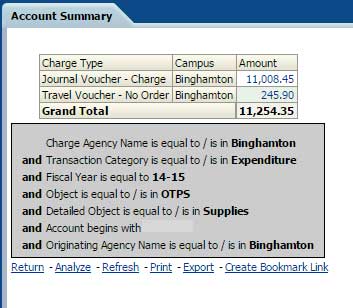
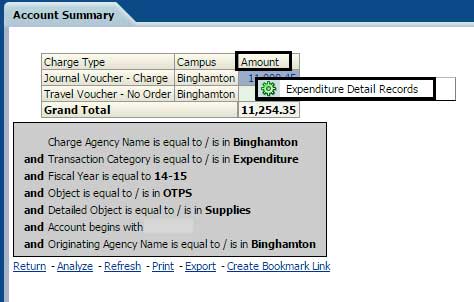
Charge Type screen:
When you click on Amount, a menu will appear with Expenditure Detail Records. This will bring you to the Document Detail screen.
Payroll Search
This allows the user to look up payroll information by account and fiscal year. You can also access this in the Expenditure Inquiry dashboard.
Open PO’s
Based on account number, this shows any open PO’s.
Actual Alloc/Exp/Enc
Shows actual transactions by Transaction Category (Allocation, Expenditures and Encumbrances).

Pending Alloc/Exp/Enc
Shows pending transactions by Transaction Category (Allocation, Expenditures and Encumbrances).
All Alloc/Exp/Enc
Shows all transactions by Transaction Category (Allocation, Expenditures and Encumbrances).
Expenditure Inquiry Dashboard
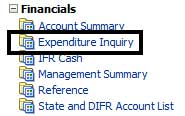
The Expenditure Inquiry Dashboard is primarily used to look up Purchase Order payment information. To get to the Expenditure Inquiry dashboard, click the Dashboard pull-down menu and in the Financials group, click on Expenditure Inquiry.
Expenditure Inquiry Dashboard screen:

Purchase Order Lookup
The Expense Inquiry dashboard allows users to look up to see if a purchase order has an invoice processed against it and to find the payment details.
In the Expenditure Search, make sure you do the following:
- Clear out the Account # (make sure it is blank)
- Select nothing for Fiscal Year
- Type in Procurement Number (PO #) or Requisition Number
- Click Apply
Expenditure Search results screen:
You will see columns for Document Number, Procurement Number, Requisition Number, Check Number, Check Date, Account, Sub Object, Transaction Desc and Amount. Anything in blue is drillable.
If you click on Document Number, which is also the Voucher Number, you will get the specifics of the payment and the invoice number in a separate pop-up window.
Document Number screen:
If you click on the Procurement Number, you will get specifics of the purchase order in a separate pop-up window.
Procurement Number screen:
Management Summary Dashboard
For some users, the Management Summary will be more useful than Account Summary. This dashboard will show the details of all accounts (not summarized) for a reporting level.
Uncheck the XXXX in the Sub Fund Group field by using the drop down menu (make sure it is blank). Using the drop down menu, choose a Reporting Level and then click Apply. The Fiscal Year will default to the current year.
Results are a grand total and a line for each account under that Reporting Level. Under Select View, Management Summary Account Group Including Pending will give the most information. Headings are split by Personal Service Regular and Other Than Personal Service.
Save, Print, Export
Save Search Customization
You can save an account after setting the search criteria for your account. This way you do not have to continuously search for the same account with the same criteria. Once you have set your criteria and clicked Apply, your customized account search will display in the Account Summary area.
To save your customized account search, click on the box in upper right corner next to the question mark and choose Save Current Customization.
Name your customization in the pop-up window and click OK.
To open the new customized page, go to the Account Summary dashboard and click on the box in upper right corner next to the question mark. Choose Apply Saved Customization and the name of customized dashboard. Your customized account will appear.
To print your account, on the bottom of the page, click on Print.
Export
To export your account, on the bottom of the page, click on Export. Several options exist for Export including PDF, Excel (2003 or 2007+), Powerpoint (2003 or 2007+), data (includes CSV, Tab Delimited, or XML). If you would like to keep all formating, use Excel; if you want data only, use CSV format.
Tips & Tricks
Browser/Error Resolution
- Firefox is the desired browser.
- If BI stops working due to inactivity, hit F5 to refresh or click the clockwise circular arrow at the top right of the screen.
- If you are experiencing problems, clear your browser cache before you do anything
else.
- Clear browser cache: press Ctrl+Shift+Delete (Windows) or Command+Shift+Delete (Mac).
Editing
- Click Return to get back to the previous page after you have drilled down. Do not use the back button as you will lose all your selections.
- Always use the 6 digit Account Number.
- If you want to view a specific Sub Account, then enter 6 + 2 digits in format 999999- 99.
- You must click Apply in order for Selections (criteria) to run. Click Tab after entering or blanking out Account Number. This will populate the Fiscal Year and Campus fields for choices, if necessary.
- When drilling to details, you can drag a column (when getting crosshairs on top of column) to the top and create a section or pivot table.
- You can save Prompt values by clicking on the 3-line icon to the left of the question mark and click Save Current Customization.
- At the bottom of the page, click the up/down arrow at the end of a list to return all rows.
Exporting
If you experience a problem exporting an Excel spreadsheet, try exporting to an earlier version of Excel.
When exporting, if you want values to populate on all rows, export to CSV not Excel. You can export or print all sections of a dashboard page by clicking on the 3-line icon located in the upper right corner to the left of the question mark and clicking Print or Export.
Contact Information
Scott Hatch
777-2099 shatch@binghamton.edu
Desera Johnson
777-5154 djjohnso@binghamton.edu