About:
Grades/Ages: grade level: 5-8
Students will practice excavation, note-taking skills, and analysis of artifacts and
features in stratified soils at a simulated site.
Materials:
Constructed Unit Boxes 1-2 buckets (1-5 gallon) per unit box. (for soil transport, storage, sitting, etc.) 5 gallon buckets are one of the archaeologist's best friends! 2 measuring tapes (3-5 meter) 2 trowels and dustpans per unit (or 1 per digging student) 1 sheet of graph paper, ruler, clipboard, and pencil per unit 1 level form per level, per unit Personal notebooks/journals to record thoughts and ideas Optional equipment: gloves, foam knee cushions, whisk brooms, camera for documentation, garden sprayer tank (for soil preparation), 8x8' soil tamper
Preparation:
Choose a large, open area in which to set up the excavation boxes.
Prepare a sketch of the "site." on graph paper. Choose either a prehistoric or historic
site (or both if you are ambitious) and decide which features you will include. The
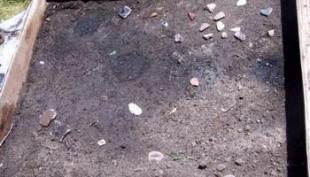
key to a good simulation is creating believable features. Scattering artifacts creates
a simple treasure hunt and does not provide the opportunity to discover a rich martix
of form, function, context, complex observation, analysis and spacial relevance that
a feature or series of related features provides. You can go a step further and try
to recreate part of a real site. If you can find a site-map of a professionally excavated
and documented site with a scale, that will work. Sketching the features in higher
detail is also recommended. If you can aquire more detailed maps of a real feature,
you can use that. Not only will it help you in the creation of the feature, but you
can use the drawing as a reference for students after they uncover the feature. Sometimes
excavation can be a destructive process.
When the site is sketched, choose where the units will intersect. Having used graph paper, drawing in the units' locations should be easy. Remember units are 1x1 meters (~3x3ft).
Lay down the "sub-soil" first, using a tamper and/or a sprayer to compress and pack it down. To maintain visible and texture differences between the soil levels, it's best to use sand or a sand mixture for the sub-soil. It may take a few sessions of spraying and tamping to achieve a natural soil feel. 5-8 centimeters are recommended.
Using your drawings, create any of the feaures that will intrude into the subsoil. Hearths, storage pits, privies, wells, and foundations all usually intrude into older soil horizons.
Start laying down the next soil horizon, placing any artifacts in the soil as you
build it up. Make sure to fill in and around your features and pack it tightly. Try
using a darker loam for the next soil horizon to help differentiate it from the sub-soil.
3-5 centimeters are ideal for the upper soil level.
Using a sprayer, evenly add water to the soil, and tamp it down as before. Multiple
tampings may be necessary.
Repeat the last 2 steps if you wish to create a third soil level, again making sure to use a soil with a different color and texture. Two horizons are usually more than enough for a group for a one-day session.
Cover with a plastic sheet or tarp. This will keep the soils from drying out and loosening up. Leaving it overnight will allow the soils' moisture to diffuse as well, making for a less muddy experience.
Lesson Objectives:
- Carefully excavate soils to uncover features and artifacts.
- Take descriptive notes about features and artifacts.
- Make accurate drawings from direct observation.
- Take accurate measurements of observed objects and patterns
- Sort and classify found artifacts.
- Draw conclusions about function of features and artifacts.
Extended Activities:
Have the students map in the site with a compass, protractor, ruler and graph paper, and a 50-100 meter tape measure. Standing at a datum point, use a compass and tape to identify points on the corner of each unit. Use the angle from the compass to find the angle and distance on the page with the protractor and ruler. Compare your own map with theirs to see how accurate (yours or theirs!). If you opted to lay the units into the ground, only put in two nails and have students use the Pythagorean Theorem to verify the missing corners. Have students find the volume of soil removed from a unit by using the formula: Volume=length x width x height. Have students measure and weigh artifacts and create a system for labeling and/or classifying them. (historic/prehistoric, artifact type, color, shape, material, etc.) Students can pick out their favorite artifact and make a detailed drawing in their notebook. Students can make an illustration of how they think the site looked when it was occupied. Have the groups record and graph (pie chart, graphs, etc.) the number of artifacts found in each unit of the site, or the number of each artiface type found. Create a statistical analysis of the site and find the mean number of artifacts found per unit, median number per unit, or mode of all units.
Procedural Step:
Students should write down observations of the surrounding area. They should write down any thoughts on what activities may have occurred at the site area in the past.
Break the students up into groups, with 2-3 per unit being ideal. One student can screen while the other two trowel-scrape the soil. Novice excavators are prone to poking, gouging, chunking, and otherwise digging too deeply, too quickly. Trowels should be used to carefully scrape down through the soil over a wide area. Explain it as "pulling off the layers like sheets from a stack of paper" as opposed to taking it out in blocks.
A student from each group should record the site name, unit number, group members' names, and date on the level form.
Using the datum string, measuring tape and line level, each student should record the starting depths in each corner of the unit on the level form.
As the students trowel down through the first level, they should put all found objects into one bag. A tag should be written out for each level/bag of artifacts.
When students excavate to the levels of the prepared features, extra care should be taken to ensure the form and arrangement of the feature does not get scrambled. After features become visible and cleared by students, pictures can be taken, and a drawing should be completed in the box on the level form, oriented correctly to the page. Students should write in their notebooks what they think the feature is and what activites it arose from.
After the top level of soil has mostly been scraped from the subsoil, students can end excavations. Artifacts are rarely found in the subsoils here in North America, as they usually correspond to the Pleistocene epoch, when few if any humans were living on this continent.
Hopefully, the soils can be easily separated on the back-dirt pile for storage or re-use. You can put the soils in piles or buckets for storage. If you leave them outside over the course of a year, they will erode away, helping to level the surrounding area!
Have the students pack up all the gear and collect notes and artifacts for discussion.
Gather the groups together to discuss the findings. Have students compare their artifacts, describe the features they found and any conclusions they could draw from what they found about what went on at the site. If a projector, or a black or white board is available, showing your original site sketch might help students to draw more conclusions about the overall function of the site.